| Mercury References |
Capsule Differences
The table below lists all the
launches of Mercury capsules. While the book does not intend to
provide a detailed history, such a list gives a good reference
point for spacecraft-to-spacecraft differences which a model builder
would notice. In doing research, I have found many differences
in markings on the capsules. The table shows the capsule number,
date, and mission highlights. I have created a second table
with info on color patterns and markings. The final table in the
book combines these two tables. Another page
has notes on each mission with links to relevant images. I have
also added a page with miscellaneous
detail photos that don't necessarily fit with the other areas.
Your comments are welcome. I don't claim to have all of this sorted out one hundred percent.
Boilerplate and Prototype Capsules
The test spacecraft were similar, in general, to the final manned vehicle design, but they did have some significant differences that modelers need to be aware of if they wish to represent one of those capsules. First, they were built by NASA Langley, not McDonnell. There were also two types of test capsules. The true boilerplates (smooth sheet metal conical body) were used on the first two early beach abort tests and apparently LJ-6. These were early designs called type "C" and type "D". The "C" design had an extended recovery section, which is clearly seen in this wind tunnel photo. A revised shape ("D") was used on the second test, but it still used the simple boilerplate construction. Also, many details in the escape system changed in nearly every test. The tower clamp ring attachment to the capsule is a good example of this. But a lot of this would be tough to detect on a 1/48th scale model.
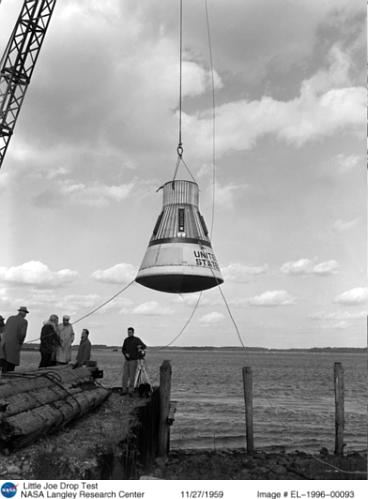
Most of the subsequent Little Joe flights used prototype capsules a bit more like the flight version, but there were still significant differences. These prototype capsules had a smooth outer surface on the lower (aft) pressurized section, and a corrugated exterior on the forward part of the conical capsule and on the recovery section. These corrugated sections were usually left natural metal, while the pressurized areas often had a combination of alternating orange and white quadrants. It has been difficult to discern this pattern on black and white photos since the orange area appears as white in these images. I also have found several photos of prototype capsules that I have been unable to trace to a particular flight, such as this photo of a drop test. Were these capsules even given serial numbers of any sort?
Peter McQuillan (a modeler rocket builder in England who I have been corresponding with about this topic) has made considerable progress in sorting out the markings of the five Little Joe flights with prototype capsules. He has summarized some of his results at his web site. I've made changes in this site to reflect that info, and it means I have a few errors in the book regarding these flights. Still, there are many unanswered questions when trying to positively identify which image goes with what mission.
Production capsules were also used on some Little Joe flights and even a beach abort test. In addition to the exterior surface differences noted above, the prototype capsules had a Recovery Section diameter of 30 inches, while the production capsules had a 32 inch diameter for that section. Note also that the capsule serial number is not usually a good indicator of when it was flown. For example, production capsule 14 was used for the early LJ-5A and -5B flights, yet it had the later-style large window and explosive hatch.
| Mission | Date | SC | Launcher | Astronaut | Comments |
| BA | 3/11/59 | BP C | None | None | First beach abort escape tower test at Wallops. |
| BA | 4/12/59 | BP C | None | None | Second beach abort escape tower test at Wallops. |
| BA | 7/22/59 | BP D | None | None | Escape system test at Wallops. |
| LJ-1 | 8/21/59 | P | Little Joe | None | Wallops abort test. Tower fired on pad and the damaged capsule was recovered from the ocean bottom. |
| BJ-1 | 9/9/59 | P | Atlas 628/10D | None | Cape. Reentry (ablative heat shield) test. No escape tower installed. |
| LJ-6 | 10/4/59 | BP | Little Joe | None | Wallops. Successful LJ performance test. |
| LJ-1A | 11/4/59 | P | Little Joe | None | Wallops. Abort test at max-Q. LJ booster failed. |
| LJ-2 | 12/4/59 | P | Little Joe | Sam | Wallops. First flight with a Rhesus monkey. |
| LJ-1B | 1/21/60 | P | Little Joe | Miss Sam | Wallops. Abort test at max-Q. Capsule re-used on MR-BD. |
| BA-1 | 5/9/60 | 1 | None | None | Wallops. Escape tower test (Beach Abort). |
| MA-1 | 7/29/60 | 4 | Atlas 50-D | None | Booster blew up. No escape tower installed, capsule destroyed. |
| LJ-5 | 11/8/60 | 3 | Little Joe | None | Wallops. Abort test at max-Q. First LJ flight with a production capsule. Tower fired on pad. Capsule destroyed. |
| MR-1 | 11/21/60 | 2 | MR1 | None | First Redstone mission ended in a pad abort. Rocket labeled "MR-P". |
| MR-1A | 12/19/60 | 2A | MR3 | None | Successful unmanned suborbital flight. |
| MR-2 | 1/31/61 | 5 | MR2 | Ham | First Redstone chimp flight; suborbital. |
| MA-2 | 2/21/61 | 6 | Atlas 67-D | None | Successful unmanned suborbital flight. |
| LJ-5A | 3/18/61 | 14 | Little Joe | None | Wallops. Abort test at max-Q. Tower fired on pad. |
| MR-BD | 3/24/61 | P | MR 5 | None | Booster development test. Re-used LJ-1B capsule. |
| MA-3 | 4/25/61 | 8 | Atlas 100-D | Robot | Booster blew up, capsule recovered and used on MA-4. |
| LJ-5B | 4/28/61 | 14A | Little Joe 7 | None | Wallops. Re-flight of capsule 14. Abort test at max-q. |
| MR-3 | 5/5/61 | 7 | MR 7 | Shepard | First manned sub-orbital flight, Freedom 7 |
| MR-4 | 7/21/61 | 11 | MR 8 | Grissom | Grissom's Liberty Bell 7, capsule lost. |
| MR-5 | 15 | Was scheduled for MR-5 but became testbed. | |||
| MA-4 | 9/13/61 | 8A | Atlas 88-D | Robot | First successful orbital flight of capsule. (re-used from MA-3) |
| MA-5 | 11/29/61 | 9 | Atlas 93-D | Enos | 2 orbits with chimp. |
| MA-6 | 2/20/62 | 13 | Atlas 109-D | Glenn | First manned orbital Mercury flight (3 orbits), Friendship 7 |
| MA-7 | 5/24/62 | 18 | Atlas 107-D | Carpenter | Second manned orbital Mercury flight (3 orbits), Aurora 7 |
| MA-8 | 10/3/62 | 16 | Atlas 113-D | Schirra | Made 6 orbits, Sigma Seven. |
| MA-9 | 5/15/63 | 20 | Atlas 130-D | Cooper | Final manned Mercury flight, 22 orbits, Faith 7. |
| MA-10 | 15B | Atlas 144-D assigned | Modified for proposed 48-orbit, 72-hour MA-10 mission [1, 1A]. Added external battery pack on retro-pack. Marked with Freedom 7 II | ||
| MA-12, -13 | 15A | 15A Modified for 18-orbit MA-12 and MA-13. | |||
| 10 | Ground test vehicle. Not flown. | ||||
| 12B | Modified to 18 orbit configuration. Not flown. | ||||
| 16 | 15 and 16 were originally built for Redstone flights but were not needed. 15 evolved several times (see MR-5, MA-10, -12). These (and likely 17 and 19) were considered for an unmanned recoverable orbiting astronomical observatory (ref. Aviation Week, January 11, 1965). | ||||
| 17, 19 | Became spare parts source after MA8 success. |
Note: BP = boilerplate. P = prototype, BJ = Big Joe, LJ = Little Joe, BA = Beach Abort, MR = Mercury Redstone, MA = Mercury Atlas. Launcher number is as marked on the vehicle.
The table above is based on Appendix 4 of Project Mercury - A Chronology, and a McDonnell chart entitled Project Mercury Historical Summary, dated 4/20/66. Additional research and comments by the author.
Modeling
I have an article in a new Kit Gallery section with lots of photos on building Revell's Mercury capsule with modifications to exhibit it in the on-orbit configuration.
References
Here are some NASA books that
are posed in their entirety on-line.
For additional info on individual Mercury capsules, including their present location, see:
A Field Guide to American Spacecraft.
and Ross Finlayson's: